- Contact us today on:
- 9905 0105
- [email protected]
EASY-TO-USE CHASSIS HEIGHT GAUGE
EASY-TO-USE CHASSIS HEIGHT GAUGE
Chassis Height – A Critical Setup Measurement
Measuring your critical chassis height has always been a bit awkward. You lie on your stomach on
the cold dusty floor and try to hold a tape measure up to the frame. And each time you make a
change you must re-measure to be sure you’re not too low (won’t pass tech) or too high (transfers
too much weight to the outside tires). Takes all the fun out of setting up your car! Here’s a super
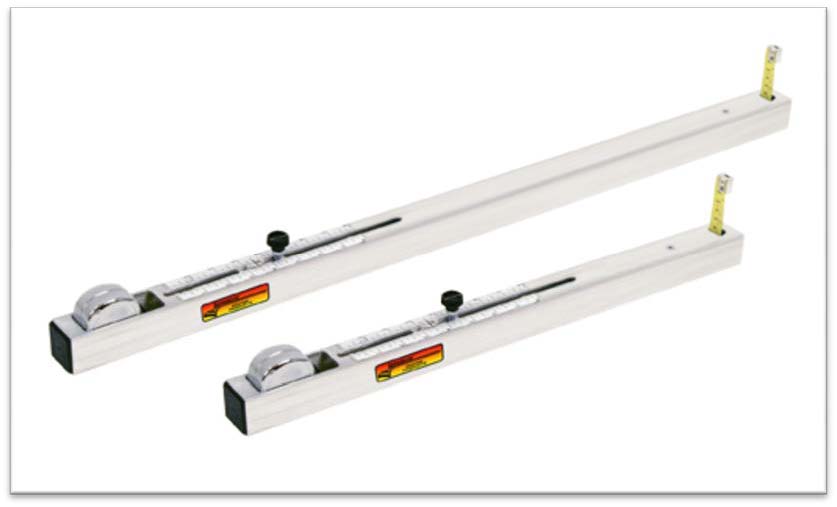
easy way to make these measurements. These slick new Chassis Height Checkers make quick and easy
work of getting this critical dimension consistently to within 1/16” – without even getting dirty.
Simply slide it under the car, raise the tape until it touches the frame, and read the height.
Couldn’t be quicker or easier. Here’s how it works. The tool contains a tape measure with a
built-in tape lock, a slider with pointer and a black knob to clamp to the tape, and a 0-10” scale.
It also has a bearing at the end that changes the direction of the tape from horizontal (parallel
to the ground) to vertical to measure height. There are 3 different ways to use it. Pick the one
that suits your situation:
CAR ON GROUND (NOT ON SCALE PADS):
1. Release the lock on the tape measure and allow it to retract completely. This is 2” in height.
Loosen the black knob and slide the pointer to read 2.0”. Tighten the black knob to clamp onto the
tape.
2. Slide the tool under the car until the end where the tape comes out is directly under the frame.
(There are 2 different tool lengths – a shorter one for perimeter frame cars and a longer one for
straight rail cars.)
3. Push the knob toward the car to raise the tape until it touches the frame. A magnet on the end
of the tape will hold it in place. You can now read the chassis height directly – OR – you can lock
the tape and pick up the tool to read it. Record the height at the 4
corners.
CAR ON SCALE PADS
1. Place a piece of flat metal on top of the pad so it hangs over the edge. Position the checker
under this piece and raise the tape up until it touches. This represents ground level when the car
is on scale pads. Loosen the black knob, set the pointer to 0.0”, and tighten the knob. Now move
the checker under the frame as above and use the knob to raise it until it touches the frame (again
the magnet will hold it there). The reading will be the net chassis height as it would be if the
car were on the ground. No need to subtract the thickness of the scale pads from your measurement
as you would if you were measuring from the ground.
MEASURE CHASSIS HEIGHT DYNAMICALLY – AS YOU WORK ON THE CAR:
1. Measure as in either example above. Except now release the tape lock and leave the checker in
place (leave the black knob tight). The magnet holds the tape to the frame. As you work on the car
and the frame moves up and down the checker will give the actual height at that instant. This is
usually done using a set of 4 checkers, one at each corner. You can quickly see the height at all 4
corners – by simply walking around the car. This can help avoid getting the car set up just like
you want, only to discover it is either too low or too high.
Here are a couple of tricks to make it even more convenient. Look under the car and position the
tool so the tape contacts the frame. Use a marking pen mark the location of the rocker panel on the
tool. Next time you can simply slide the tool under the car to the correct depth and take your
measurement. You can also measure the height of other things on your car: headers or collectors,
crank centerline, front spoiler, fuel cell, etc. If you need to measure something over 10” simply
use another tape measure and extend the tool’s tape to exactly 10”. Loosen the black knob and set
the scale to 0”. Now just add 10” to any measurement you take.
This is a simple tool that can be used in a variety of different ways to get the critical
measurements you need. If the tape is ever damaged it can be easily replaced. There’s no
reason to have to re-setup your car just because the heights got away from you.


